Administration
Table of contents
Overview
The TOP Framework consists of:
- Frontend: Vue.js and Quasar based Single-Page Application (top-frontend)
- Backend: Spring Boot Resource Server (top-backend)
In addition, the framework uses the following services:
- PostgreSQL: Database for the backend (postgres)
- optional: Concept Graphs: Service for concept graphs (concept-graphs)
- optional: Neo4j: Graph database for storing concept graphs (neo4j)
- optional: Elasticsearch: Search engine for documents (elasticsearch)
- optional: Caddy: Reverse proxy and SSL certificate management (caddy)
- optional: Keycloak: Identity and Access Management (keycloak)
Getting started
Follow these instructions to set up the TOP framework:
Clone this repository.
git clone https://github.com/Onto-Med/top-deployment.git
cd top-deployment
Copy docker-compose.env.tpl and modify it as needed.
cp docker-compose.env.tpl docker-compose.envUse Docker Compose to startup the TOP Framework services.
docker compose up -d
If you didn’t modify docker-compose.env, you can now access the framework at http://localhost in your browser.
All data will be stored in the Docker volumes top-data, top-neo4j-data, and query-results (see declaration at the end of docker-compose.yml). We suggest to use external volumes for production deployments, so that data is not lost when the containers are removed. You can do this by modifying the volumes section in docker-compose.yml.
volumes:
  top-data:
    external: true
  neo4j-data:
    external: true
  query-results:
    external: true
This also applies to the volume keycloak-data if you are using Keycloak for authentication.
How to Upgrade
- Stop the services and backup your Docker volumes. See Official Docker Documentation.
Pull changes from this repository.
cd top-deployment git pull- Review docker-compose.env.tpl for new environment variables.
Pull Docker images and recreate containers.
docker compose up --pull always -d
Use SSL
The TOP Framework uses Caddy as reverse proxy. Caddy is able to automatically generate SSL certs for you.
Do the following to enable SSL:
Add a port mapping for port 443 to docker compose service ‘caddy’
services: caddy: # ... ports: - 80:80 - 443:443 # <- add this line- Modify the environment variable
BASE_URLindocker-compose.envto something like:https://your.domain> Restart the docker compose stack
docker compose up -d
Add Plugins
Plugins can be provided as JAR files (dependencies must be included too, see for example Apache Maven Assembly Plugin). You just have to place those JAR files in a directory and mount it to the /plugins directory of the backend container.
services:
  backend:
    # ...
    volumes:
      - top-plugins-dir:/plugins
  volumes:
    top-plugins-dir:
      # volume settings
More information about backend plugins is available at the top-backend documentation.
Add Data Adapter Configurations
You can create data adapter configuration files and mount them into the backend container by modifying docker-compose.yml. In this example, we assume that the data source configurations reside in the ./configs folder. To make a data source available to an organization and all of its repositories, an administrator has to add the data source in the organization page via the “Manage”->”Data sources” menu. For a detailed specification of the configuration files, see Data Adapter Configuration.
services:
  backend:
    # ...
    volumes:
      - ./configs:/configs:ro
There is also an option to upload specific formats to create a data source that is directly stored in the backend database. This is currently only available for testing repositories and only FHIR and CSV files are supported (see Figure 1). However, after the upload has finished, you can enable the data source for any organization. Navigate to the organization page and select “Manage”->”Data sources” to do so.
More information about the testing functionality is given in Repository Testing.
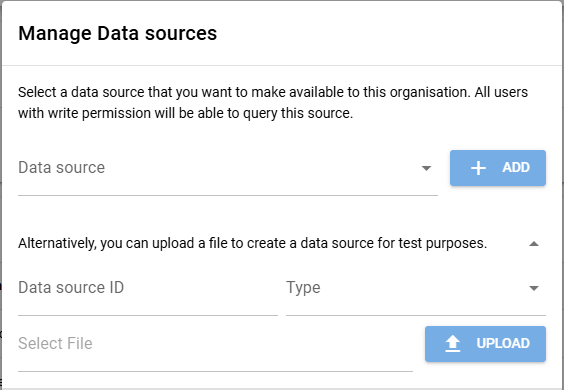
Figure 1: TOP Framework modal to select or upload data sources.
NLP/Document related configuration
To utilize the document search of the framework, three different services need to be running:
- Elasticsearch or something similar
- A Neo4j cluster
- And the concept graphs service
The document search is adapter-centric and requires a working configuration file (YAML) that specifies the addresses of the above services in the folder declared with the DOCUMENT_DATA_SOURCE_CONFIG_DIR environment variable. If no DOCUMENT_DEFAULT_ADAPTER is specified, the first adapter found in the folder is used for setup.
Similarly to data adapter configurations, document adapter configurations must be mounted into the backend Docker container.
For convenience reasons, the default value of DOCUMENT_DATA_SOURCE_CONFIG_DIR is /configs/nlp, which means that you can create a sub folder nlp in the host systems configs folder and reuse the Docker mount configuration from Add Data Adapter Configurations.
Protection with OAuth2
If you want to protect front and backend with OAuth2 authentication, you must set up a Keycloak server. Respective Keycloak containers are already included in the docker-compose.yml file (use docker compose profile “auth”, e.g.: docker compose --profile auth up -d).
You may also need to modify the configurations in docker-compose.env.
If you are running Keycloak for the first time, you need to create an admin account. In the docker-compose.yml file, set the environment variables KC_BOOTSTRAP_ADMIN_USERNAME and KC_BOOTSTRAP_ADMIN_PASSWORD to your desired username and password, respectively. After the first startup, these variables can be removed.
After starting Keycloak, log in with the admin credentials and perform the following tasks:
- Create a new realm (e.g.: “top-realm”). The name should match the
OAUTH2_REALMenvironment variable indocker-compose.env. Create a new client for that realm (e.g.: “top-frontend”). The name should match the
OAUTH2_CLIENT_IDenvironment variable indocker-compose.env.- Root URL:
http://localhost/auth(or your domain if you are using SSL) - Valid Redirect URIs and Web Origins:
http://localhost/*(or your domain if you are using SSL) - Valid post logout redirect URIs:
+
- Root URL:
Optionally, you can create a user group (e.g.: “top-managers”) with roles “manage-users”, “query-users”, “view-realm”, and “view-users”. Assign users to this group to allow them to manage users in the TOP Framework.
Authorised users can log in at http://localhost/auth/admin/top-realm/console. As an alternative, account management can be accessed via the “Edit account” option in the top right menu of the TOP Frontend, followed by “Applications” > “Security Admin Console”.
The TOP Frontend should now display a login button in the top right corner. If a visitor clicks on that button they will be redirected to the Keycloak login page. After a successful login, they will be redirected back to the TOP Frontend.
Troubleshoot
java.lang.OutOfMemoryErrorwhen running queries:Depending on the query complexity and the amount of data available in a data source, queries may require a lot of memory (RAM). You can increase the Java Runtime Environment’s maximum Java heap size with the -Xmx option.
Override the
entrypointof thebackendservice in the docker-compose.yml file:services: backend: # set maximum heap size to 4GB entrypoint: [ "java", "-Xmx4G", "-cp", "top-backend.jar", "org.springframework.boot.loader.launch.JarLauncher" ] # other options...No read access to mounted files in Docker containers:
In case you are using SELinux, mounted files such as
Caddyfilemight not be readable by the Docker containers. You can add thezflag to volume specifications in thedocker-compose.ymlfile to modify the SELinux label of the host file or directory.e.g.:
volumes:
  - ./Caddyfile:/etc/caddy/Caddyfile:z
How to configure the framework to use a port other than 80 or 443?
If you cannot use port 80 or 443 for some reason, for example if you are using rootless Podman, please update the configuration as follows:
Add the desired port to the environment variable
BASE_URLindocker-compose.env.e.g.:
BASE_URL=http://localhost:8080Change the port mapping of the Caddy service in
docker-compose.ymlto:ports: - 8080:8080
In the above example, the
BASE_URLuses port 8080. The same variable is also used inCaddyfile. This means that Caddy will listen on port 8080 for incoming requests. Therefore, you need to map the internal port 8080 of the Caddy service to the host’s port 8080 in order to expose the TOP Framework components.These changes are necessary, because the frontend is a TypeScript application running in the browser. It cannot communicate directly with the backend via the Docker Compose network. Instead, it sends requests to the URL specified in
BASE_URL.